Homemade Chalkboard
With Faux Rust Frame
Designer accessories
at bargain prices!
My Homemade Chalkboard project...
So the world is practically covered in chalk-paint projects right now, and since it is all the rage, I was asked to make a huge "Announcement Chalkboard" for a wedding!
How fun is that!
With my husband's amazing woodworking skills, we set out to make an epic 4+ foot tall chalkboard with a permanent frame, which also had a custom rust patina finish to it.
I mixed up some chalk-paint with a surefire recipe, which of course you can use on any of your own projects!
I'll also let you in on my secret "Rust Patina Recipe"! You will love it...plus it's so simple!
This was a thoughtful yet practical wedding gift since the couple could not only use it at their wedding, but to display later in their home...kind of a "double duty wedding gift" basically.
BONUS: It was a project hubby and I worked on together, which made it equally awesome!
All in all this was a fun and easy DIY project which took very little time to accomplish the amazing results.
Let's get started...
WHAT YOU NEED
- Sheet of plywood, or any flat piece of wood will do. You may have to cut to size, we cut our piece to about 4 1/2 x 3 1/2 feet
- Pieces of fancy or plain trim. Solid wood, or pressed PDF. We used 3in width pressed PDF in two 8ft lengths. Preferably already primed.
- Scrap pieces of lumber for back of board, to hold frame on. 1in x 4in
- Chop saw, glue, nail/staple gun, proper safety gear [for front trim and support frame]
- Chalkpaint - you can make it any color you want, this example is in classic black
- Paint roller, paint tray, brush
- Rustoleum® Metallic silver spray paint
- Clear Coat Spray - I used matte finish
- Rust colored acrylic paint, also brown and a little black
- Mixing bucket, paint brush, T-shirt Rags
- Spray bottle of water
PAINT RECIPES
Faux Rust Paint Wash Recipe #1
- 2 Cups water
- 4-8 Tablespoons rust color acrylic paint.
Mix paint and water together thoroughly.
Faux Rust Paint Wash Recipe #2
- 2 Cups water
- 4-8 Tablespoons Rust color acrylic paint
- 2-3 tablespoons Dark brown acrylic paint
Mix paints and water together well.
Homemade Chalk Paint Recipe #1
This recipe is for one cup of chalk paint, triple or quadruple the recipe as needed for your project.
- 1 cup Acrylic Paint [I used my fav classic black, Cracked Pepper]
- 2 Tablespoons Non Sanded Powder Grout
- Warm Water
- Mixing container
- Mixing spoon
In a mixing container mix non sanded grout with water, adding a little water at a time until you get a smooth consistency. keep adding warm water to break up the powder.
Once the non sanded grout and water are mixed thoroughly with no clumps slowly pour in paint, mixing as you pour. Combine until smooth.
Easy Steps To Achieving Your Homemade Chalkboard
1
1. First cut your piece of plywood to the desired size. If you don't have the means to cut a piece of plywood, you can buy them pre-cut at stores like Lowe's or Home Depot. Or have them cut them to a custom size for you.

2
2. Mix together your chalk paint. You will have to work fast since this dries out pretty quick.
Since we were working in the cold garage, we were actually having trouble getting the chalk paint to dry all the way and to cure properly! But trust me, in moderate temperature...it will dry out quickly.
TIP: Make sure your work area is nice and warm. Not only does it make for pleasant working conditions, but allows your paint/project to dry properly and in a timely manner.

3
3. Roll or brush on your chalk paint. I chose to brush on the first coat, a little time consuming since my paint kept freezing up...LOL. I did two coats, letting dry between coats.

4
4. While the first coat of chalk paint is drying, let's get to work on patina-ing the pieces of trim!
Yes...the fun part!

Creating A Faux Rust Metal Frame
We are now going to create this AWESOME Faux rusty looking metal trim...
5
5. Lay out your trim out on some sawhorses. I purchased pre-primed trim for this project. If you have unprimed trim, I highly recommend priming it for this project in particular...
ONE: Because then the spray paint won't get entirely absorbed into the bare wood, thus eliminating multiple coats of spray paint.
TWO: The spray paint will also adhere better to the primed trim, saving you some frustration in the end.

6
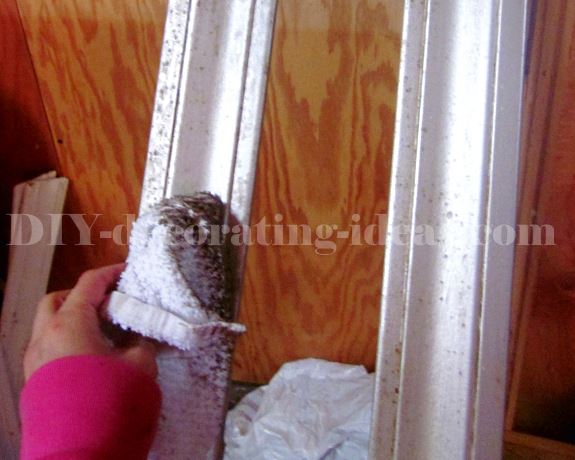
6. Use your spray bottle or flick water onto the trim using a water soaked paint brush, splattering it all over in your desired pattern. Then quickly spray over the pieces of trim, water and all, with a coat of Rustoleum® metallic silver spray paint.
Apply a nice light to medium coverage of spray paint.
You will want to cover as much or as little trim as possible, you only get one shot at this step so apply spray paint coverage to your liking. I went for a medium coverage.
Leave the trim pieces undisturbed to dry, careful not to disrupt the water droplets on the trim. Let the trim paint sit until dry to the touch...
Then take one of your rags and gently begin to pat and wipe the trim, the water droplets encased in the paint will burst and leave you with bare spotty trim. Pretty cool!

NOTE: I wanted to share with you how I changed around step #6 for my project!
Normally you would spray the trim with a spray bottle set on a coarse spray, but I was lucky...it was actually raining outside!
Since the pre-primed trim pieces needed to be sprinkled with water anyway, I thought, hey why not let nature take its course on this project?
So, I left my primed trim pieces on sawhorses out in the rain for a few moments, then when I liked the water droplet coverage I sprayed right over those puppies (out in the rain and all) with my Rustoleum® Metallic Silver spray paint.
I then carefully brought my sprayed trim undercover to let it dry to the touch, being careful not to disrupt the paint encased water droplets.
Let the trim dry to the touch, one good coat of spray paint should do the trick. I was really very pleased at how natural the faux rust spots were turning out! It looked so natural!
Now if you don't have the luxury of rain on a daily basis as we do... use the spray bottle, paintbrush flick method mentioned in step #6, where you will have a bit more control on the final outcome of your trim, and it will look just as awesome!
7
7. Mix up some Faux Rust Paint Wash #1, see recipe above. You don't need a lot of this wash either. A little goes a long way.
Sweep your loaded paintbrush with Faux Rust Paint Wash #1 over the trim making sure you cover all the bare droplet spots. The messier you apply this the better it looks!
To make it your desired shade of rust or you can layer paint washes, which is what I did. It's easy and fun!

8
8. Let it dry for about 5 minutes.
While it's still wet, softly wipe and blot down the trim with a rag removing most of the rust color.
All the paint wash will have soaked into the water droplet spots creating a very authentic and convincing looking rusted piece of weathered metal trim...
Gotta love it!
9
9. When its dry to the touch, apply with a brush Faux Rust Paint Wash #2 (darker rust wash) over the trim as well.
Let dry partially and wipe gently with a damp rag, blotting to remove the wash to your liking.
I applied one more coat of Faux Rust Paint Wash #2. (just a personal preference)
This will gave my trim much more realism and depth.
Let dry completely.
So...just to clarify, I applied 2 coats of each Faux Rust wash, 4 coats in all.

Above is a picture of the finished Faux Rust metal trim, so you can get an idea of how realistic this looks! Sorry if your browser does not do it justice
10
Continuing with the homemade chalkboard paint...
Now, back to the actual chalkboard...
11
11. Now that your trim is done, apply another coat of chalk paint to the board.
I used a roller this time around, which was much faster. Since it was so cold out while I was creating my homemade chalkboard, using the roller kept the chalk paint from getting too stiff.

TIP: I did notice that when the chalk paint dried it was a little more bumpy than I would have liked. If you prefer a smoother surface, use one of the denser paint rollers for cabinet or ceiling painting instead.
It will ensure that your homemade chalkboard paint finish is nice and smooth. Using a fluffy roller, as I did, will create a coarse finish in your chalkboard paint.
 As you can see my homemade chalkboard is a little bit on the bumpy side
12
12. Que Husband...
He cut all the pieces of trim to length; built a support frame with the lumber, then placed the finished/painted chalkboard on top. The edges of the frame were about 1/2 inch bigger than the chalkboard itself.

13
13. Next he placed the cut trim frame pieces around the chalkboard and nailed them to the backing frame.

14
14. Next, he flipped the chalkboard over (chalk side facing up). He then cut the trim front frame pieces, (which were already pre painted).
He cut them about 2 inches longer than the actual chalkboard support frame. This way the trim would have a nice overhanging boarder.
NOTE: Below is a picture of the backside of the chalkboard with the support frame and front trim frame pieces in place. See how the front trim is sticking out further than the support frame edge.

15
15. To give our homemade chalkboard a finished and professional look, we chose to paint the back of the finished chalkboard a pretty prairie, vintage lilac purple (you can get a similar color here)

16
16. Painting the back of this homemade chalkboard project gave it that polished, finished look.
Plus the color we used also complemented their wedding color scheme...just in case anyone peeked at the back side of the chalkboard.

17
17. We also chose to add a little personal note from us on the back of the chalkboard using a Sharpie® marker...

18
18. Voila...our finished homemade chalkboard! Perfect in every way!
So easy for you to do as well!
This homemade chalkboard can be scaled down to be much smaller if you wish, plus you can attach picture hanging hooks to the back as well, making it easy to position and hang anywhere in your house! Kitchen, office, play room...
Sky's the limit!
19
19. Since it was for a wedding I needed to add a message on the actual chalkboard. Check out some of the freehand wedding lettering in progress...

Almost done...

20
20. Add some final designs to this homemade chalkboard.
The chalkboard letters are not perfect as it was all done by freehand and because of the rough surface created by the type of roller I used to roll on the chalk-paint.
But...
It had the rustic "authentic look" they were hoping for.
Win, win!

21
21. Taaa DA! The bride and groom were very happy with their homemade chalkboard gift! This homemade chalkboard really gave off that rustic vibe they were hoping for!
Everyone absolutely loved it!

More Projects!
If you enjoyed this project, be sure to check out more of my DIY decorating projects...
Check out my to-die-for aqua table distressing DIY project here...
Or my white herringbone end table DIY project here...
Rescue Recycle Reuse
From my artistic eye, I'm always trying to re-create looks of furniture or textiles that I've seen at markets, stores or in books and magazines from junk or second-hand stores...but for less, much less.
Warning: If you continue following my transformations, such as this homemade chalkboard, soon you will not be able to pass by a second-hand store, garage sale or even Craigslist without wondering if that piece of junk can be transformed into something spectacular.
It's a hobby. I love it. And I love sharing my results with you. If the transformation bug has bitten you, be sure to share your project, idea or advice with other DIY Decorators here...
Share Your Thoughts or Project
Do you like this project? Do you have anything to add to it? Have you done a project similar to this? Using my methods? Please share your DIY project or add your comments for all my visitors.

|
|
|
|
|
|
|
Newsletter

June Tailor and Quilt As You Go sewing kits
Since 1961, June Tailor has been developing and manufacturing innovative products for pressing, cutting, piecing and quilting for all levels of sewists from novice to advanced. June Tailor has it all!
Sewing & Cutting Cabinets
The perfect solution for any sewing room! Choose from hundreds of sewing cabinets, cutting tables and sewing chairs with features like rolling caddies, dedicated storage, multi-position lifts and more. Go here to find yours!
TRADE UP AND GO!
How Does It Work?
Trade in your GO! Me or GO! fabric cutting machine to get a great deal on a new fabric cutter!
Step 1
Select your trade-in fabric cutter model and credit method and purchase a Fabric Cutter Trade Up Set.
Step 2
Use the shipping label included with your new fabric cutter to send us the trade-in fabric cutter. Please follow all instructions provided in your confirmation email.
Step 3
Get your trade-in credit once we receive and validate the trade-in fabric cutter.
Go here to learn more!

Recent Articles
-
DIY Fireplace Makeover
Oct 03, 24 12:16 AM
 Make your space stunning with the DIY Fireplace Makeover that is also budget friendly.
 -
Less stressful Way to Purchase Traditional Middle Eastern rugs
Jul 10, 22 06:03 PM
 I have always found the purchase of a traditional Middle Eastern rug to be a stressful experience as they are a huge investment. But they are so beautiful
 -
Seasonal Decoration Changes
Feb 27, 21 05:34 PM
 I am in the later half of my life. I have always dreamed of having a home that was a neutral background and I could use artwork and decor to change the