Herringbone Table Project
Designer in style furniture at bargain prices!
DIY Herringbone Table Project
Anything herringbone is totally “in” these days! Whether it’s a small side table a headboard or an entire floor! Little bits of it here and there are tasteful also, giving a nod to the fads without being completely overloaded and committed to a trend in passing.
When you tie a herringbone wood pattern into your living décor especially with some color, it really adds visual interest to a room giving it warmth and texture, but without being too overwhelming.
Ever wonder what to do with those old closet shutter doors that you hated cleaning?
And since herringbone is so popular right now, I came up with a solution. They are exactly perfect for what I used to make this herringbone end table project.
This end table project was quite the feat, but well worth the effort as you can see....
FREE End Table I Used To Change Into Designer Furniture...
We started with an older solid wood table that had been left out in the weather and when I say weather I mean lots of rain!
The top was pretty water warped, thus having to spend a little extra time and effort into leveling it, all in all being a group effort it was quite a rewarding project!
TIP: I suggest making a “Jig” to cut all your “wooden herringbone slats” to exact length to save any mismatched edges and tears when your edges are not perfect. Precision is key in this project!
[I will have plans for a jig you can use soon]
WHAT YOU NEED
Below is a list of items used in this project of which you probably have most of them on hand, but for the ones you don't, one of my all-time favorite places to shop is the Rockler Woodworking and Hardware Superstore
- Wooden end table
- Wood filler
- Putty knife
- Thin wood sheeting the size of your tabletop - this is necessary only if you need to level your table-top
- Old wooden shutters - we were able to complete this project with the slats from a single shutter
- Safety glasses
- Hammer
- Pliers
- Small Crowbar
- Level
- Masking Tape
- Clamps
- Wood Glue
- Finish Nail Gun
- Router (optional)
- Sand paper or better yet, palm sander
- Piece of plexiglass or tempered glass cut to the finished size of your tabletop
- Wood slats for edging or scrap pieces of trim
- New drawer knob
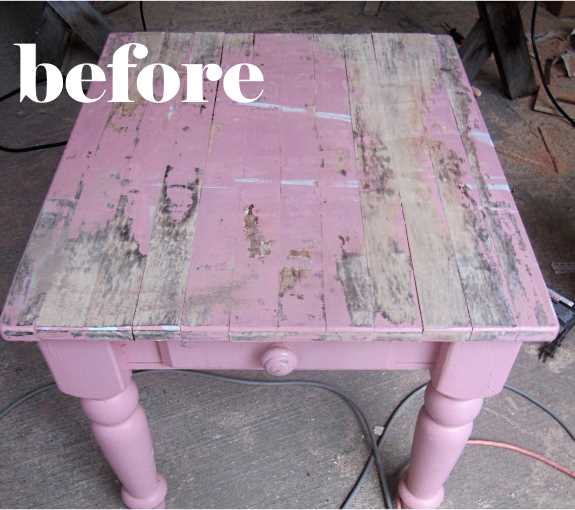
This is a pretty shabby chic piece of furniture with a charming pink color.
For some this might be an ideal look, but this particular piece we were looking to breath some new life into it so we either had to transform it or ditch it.
Here is a picture of our table before its beautiful Herringbone tabletop transformationSince it had good solid bones, even after being out in the weather, it was still a great table, so we decided to give it a makeover instead of condemning it to the burn pile.
Let's get started...
1
1. Choose the desired length for your slats to be cut. Cut all your shutter slats to that length. Make a huge pile of pre-cut slats! You will need a lot of them! We used well over 60 of them!


TIP: Something you will like to do before you begin this herringbone table project is set up a “jig” to help you cut all your shutter slats to the desired length, they will all be the exact same size if you take the few minutes to make a jig.
[I will have plans for a jig you can use soon]
2
2. If necessary, sand down your table. If your table is in good shape it might only need a light scuffing with some medium grit sandpaper before you paint it.
The table we used had to be sanded quite a bit before we could take the next step.
Make sure your surfaces are smooth.


We also had to run a belt sander over the top of our table's existing slats, the simple thing would have been to remove them all and replace them with a completely new top, but we were trying to use only the materials we already had on hand.
3
3. Next step is pretty fun...
Using wood filler, fill in any uneven spots on the table top smoothing it out with a putty knife.


4
4. Wait for it to dry and sand between coats; you may have to put several layers on.
It’s very important to have a level tabletop for this project.
Or you could skip these next few steps by putting on a new wood top, which is what we did in this step as well.
Easy enough to do, we just cut a piece of thin plywood to size, and nailed it to the existing leveled tabletop with a nail gun.


5
5. We needed a router for this step because our existing tabletop edges were very uneven from being out in the weather.
With the router we were able to get a nice straight even square tabletop.

6
6. Here is what the edges looked like after they has been routered.
Once the tabletop was square, we screwed a thin piece of plywood to the top. If your table had no weather damage you can disregard this step.

Beginning to lay out your herringbone table top
7
7. Now lay out your pre-cut slats on the prepared tabletop, play around with patterns and see which direction you would like your pattern to go.

8
8. Now this is the tricky part...
Once you have figured out the way you would like your herringbone table top pattern to go, clear the tabletop, find the center of your tabletop surface and lay the pieces starting from the center.
You will have overlap on the edges of your table, don’t worry, these will be trimmed off later.

9
9. I enlisted my amazing hubby for the majority part of this herringbone table project!
He put guide rails along either sides of the center line, and he laid the first line of herringbone.
This ensured that the rest of our herringbone pattern would be straight and even.

10
10. Once you like the center layout, spread a thin layer of wood glue over the center of the line and replace the herringbone pattern. I then taped them in place to make sure they didn't move around.
Once you’ve glued and placed the slats use the nail gun to tack down the slats.
TIP: Working in small sections is better, so the glue doesn’t dry out before you have a chance to tack it all down.

11
11. Putting one nail at either end of the slat was good enough. Depending on how wide your slats are, you might have to secure all four corners of the slat.

12
12. Below is the tabletop after nailing down each of the slats.
See how the edge slats have some overhang. Those will be trimmed off with the router.
It’s better to use longer slats around the edges rather than try to cut a piece of slat to fit the space. Plus, since it is so short, it might crack if you try to nail it down.
TIP: You can use clamps to hold down the slats while the glue dries, especially the slats around the edges.

13
13. Now that the wood glue is dry and with hubby's assistance, I was instructed on how to use a router to cut the tabletop slats flush all around and into a perfect square.
A great thing to know how to do!
Just be sure to wear protective ear and eye wear!

14
14. Zip over the entire herringbone table top with your palm sander, don’t forget to sand all the table edges, knock down any sharp slat ends.
You may have to use a bit of wood filler on the herringbone slats as I had to do in a few places, because the slats didn’t match up quite perfectly. If you need to use wood filler anywhere you will need to wait for it to dry then go back and re-sand it flush.

15
15. Flip the table over on its top, and prime the entire underside of the table, legs, underside tabletop lip and edge.
Basically slather the entire underside of the table and legs with primer. let it dry, apply two coats. When the primer was dry I painted two more coats of flat white paint on the entire piece. Let it dry.
The reason for painting the entire table upside down?
You can see the entire underside of the piece.
Waaaay easier than straining your neck to try to paint around all the spindle legs, plus you end up with a much cleaner looking painted piece.

16
16. Flip the table back upright and prime the herringbone table top. Let dry, then brush on two coats.

17
17. Proceed to paint the herringbone table top with flat white paint. I painted two coats. Let dry between coats.

18
18. I decided to put a decorative trim around the herringbone table top edge, this covered any imperfections but it also gives the table a nice finished look.
I used some solid wood scrap trim, and my hubby cut some custom 1 1/2 inch slats for the tabletop on the table saw.
We pieced it together and had just enough, we cut to length with the chop saw and nailed it in place.
TIP: I primed the trim pieces before we attached them to the tabletop.

19
19. Once your decorative trim is in place paint one more final coat of paint, three coats total on the tabletop itself.

20
20. I chose a clear coat finish for the herringbone table piece.
If you paint with a semi-gloss it’s much easier to just leave the finish, because the glossier the paint the easier it is to clean the piece,
Lol...especially if you have kids...being able to wipe down a white surface is a MUST!
SIDE NOTE: Another option, especially if you are painting a white piece and would like to preserve it, is to wax the furniture after your paint has cured.

The best wax to use for a painted white piece that will not turn it
yellow over time, I’ve found to be Briwax. I learned this secret from
my master carpenter father. It’s the clearest wax for waxing
furniture... it goes on clear and it dries clear!
Plus... if you apply several layers, buffing in-between each layer, will give your painted piece beautiful depth and character!
Briwax… simple secret weapon!

21
21. We secured the drawer front to the table front, because the drawer was so damaged it really wasn’t worth the effort to try and rebuild it.
![21. [optional] Secured the drawer front to the table front](https://www.diy-decorating-ideas.com/images/22-painted-white-herringbone-inlay-end-table-575x490.jpg "21. [optional] Secured the drawer front to the table front")
22
22. So the knob is purely decorative (pssst but nobody has to know!) Pick out an adorable new knob, I chose a very pretty clear pressed glass knob. Just what it needs! You can pick out more knobs here
Perfect!

23
23. Clean up your piece once it’s dry or cured. Wipe it down with a damp tack cloth.
Place your piece of pre-cut Plexiglas or custom cut piece of tempered glass, to protect your herringbone table top.
The glass can either be cut to sit down inside the trim or cut to be flush with the edges. If you choose the later, you can put cute pictures or artwork under the glass for display purposes.
Step back and enjoy your new piece of re-imagined furniture!

24
24. Check out the AMAZING transformation!
A weathered table was given an entire new lease on life with this miniature herringbone makeover!
We are completely in love with it!
Right now it’s working beautifully as a side table/kiddo drawing table in our playroom!

More Projects!
If you enjoyed this project, be sure to check out more of my DIY decorating projects...
Check out my to-die-for aqua table distressing DIY project here...
Or my Black faux wax coffee table DIY project here...
Rescue Recycle Reuse
From my artistic eye, I'm always trying to re-create looks of furniture or textiles that I've seen at markets, stores or in books and magazines from junk or second-hand stores...but for less, much less.
Warning: If you continue following my transformations, such as this homemade chalkboard, soon you will not be able to pass by a second-hand store, garage sale or even Craigslist without wondering if that piece of junk can be transformed into something spectacular.
It's a hobby. I love it. And I love sharing my results with you. If the transformation bug has bitten you, be sure to share your project, idea or advice with other DIY Decorators here...
Share Your Thoughts or Project
Do you like this project? Do you have anything to add to it? Have you done a project similar to this? Using my methods? Please share your DIY project or add your comments for all my visitors.

|
|
|
|
|
|
|
Newsletter

June Tailor and Quilt As You Go sewing kits
Since 1961, June Tailor has been developing and manufacturing innovative products for pressing, cutting, piecing and quilting for all levels of sewists from novice to advanced. June Tailor has it all!
Sewing & Cutting Cabinets
The perfect solution for any sewing room! Choose from hundreds of sewing cabinets, cutting tables and sewing chairs with features like rolling caddies, dedicated storage, multi-position lifts and more. Go here to find yours!
TRADE UP AND GO!
How Does It Work?
Trade in your GO! Me or GO! fabric cutting machine to get a great deal on a new fabric cutter!
Step 1
Select your trade-in fabric cutter model and credit method and purchase a Fabric Cutter Trade Up Set.
Step 2
Use the shipping label included with your new fabric cutter to send us the trade-in fabric cutter. Please follow all instructions provided in your confirmation email.
Step 3
Get your trade-in credit once we receive and validate the trade-in fabric cutter.
Go here to learn more!

Recent Articles
-
DIY Fireplace Makeover
Oct 03, 24 12:16 AM
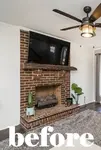 Make your space stunning with the DIY Fireplace Makeover that is also budget friendly.
 -
Less stressful Way to Purchase Traditional Middle Eastern rugs
Jul 10, 22 06:03 PM
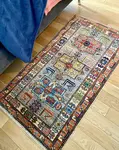 I have always found the purchase of a traditional Middle Eastern rug to be a stressful experience as they are a huge investment. But they are so beautiful
 -
Seasonal Decoration Changes
Feb 27, 21 05:34 PM
 I am in the later half of my life. I have always dreamed of having a home that was a neutral background and I could use artwork and decor to change the