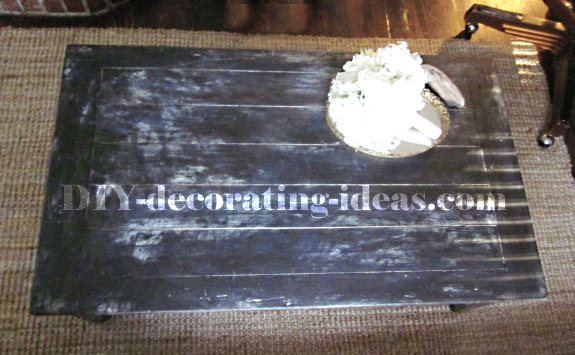
Black Faux Wax Coffee Table
Your Designer Furniture...
My black faux wax coffee table actually started as an old beat up coffee table that I had acquired from a second-hand store in which I was determined to breathe some new life into.

My Inspiration
I happen to be looking at a House Beautiful magazine and the transformation light flipped on! I saw an awesome set of expensive, dark, romantic dining chairs that had a finish on them that I wanted on my coffee table.
Unsure as to how they achieved the finish, I was determined to make my own "Finish Formula" for this table so I could admire it in my home.
BTW: I am a firm believer that just about anything can be transformed or fixed with paint.

How I see it...
From what I saw by looking at the picture and guessing, the dining chairs were stained a dark walnut chestnut mix. Then a white paste wax was rubbed over the entire chair in all the wood grain and seams, which was mostly buffed off. Matte clear-coat. Warm brown upholstery. Done. Beautiful.
Now to transform the look onto a larger scale surface and hope it will have the same stunning results!
OK...now to make it the poor man's way...LOL
Bargain Coffee Table I Used To Change Into Designer Furniture...
There were some pretty big gouges and deep scratches
all over the table I chose for my black faux wax coffee table project
[hey...it was from a second-hand store what do you expect], but the
overall shape gave off a very "Pottery Barn vibe"...but medium honey
colored wood and deep scratches?!
Not quite the look I was going for...

This black faux wax coffee table project required some work to do but I looked forward to the challenge. You will see how easy you can also achieve this faux wax look.
So, lets get creative...
NOTE: Before you begin, mix together some tinted "Ash Grey" primer, and also some "Colt Black" paint, for your project, see recipes below.
WHAT YOU NEED
- A solid wood piece of furniture, in this case a $8 coffee table...super bargain!
- Your custom mixed "Colt Black" paint or a store bought premixed latex paint...see below
- Your custom mixed "Ash Grey Tinted Primer"
- Painting gloves, painting tray, brushes, rollers and paint stir sticks, as well as containers for mixing custom colors [if mixing your own]
- Drop cloth
- Sandpaper in various grits. I used: 50, 80, 120-180 and 240
- Protective eye wear
- Tack cloth
- Faux wax...see recipe below
Below is my custom color palette which I used for this black faux wax coffee table project. Of course you can use your own color palette, but if you love the results I got from these colors...use them!

Olympic paint colors Dark Granite D32-6 and Black Magic D58-6 are pretty close to the colors I custom mixed for this DIY project.
What to do for YOUR black faux wax coffee table project...
I decided to leave the scratches and not fill any of them, figuring it would give the table some added character. I did sand it down really well though using a 240 grit sand paper.
Table before it was sanded...

Instead of putting white primer on the table I painted it with my own mix of "Ash Grey" primer.
To make your own tinted primer, determine the amount of "tinted primer" you will need to cover the entire project, and this will help you figure out the approximate amount of paint+primer you should mix together.
For my examples the paint and primer mixtures are measured out in quart measurements. Use a quart size paint container or a paint cup measure to equal an approximate color similar to the ones used in this project.
Tinted Primer Recipe: "Ash Grey"
In a quart bucket mix:
- 1 part black acrylic paint
- 1 part KILZ® primer - not oil base
- Mix well
Note: This tinted primer may be a little thick, so just add a little water to thin it out...not too much though. This will make it easier to brush on your project.
Paint Recipe: "Colt Black"
For my custom "Colt Black" paint mixture
mix together in a quart bucket:
- 1/2 black acrylic paint
- 1/2 chocolate brown acrylic paint
- Add more or less of any of the previous listed colors to achieve the color you want
- You can add a few tablespoons of water if you would like a thinner paint
- Mix well
TIP - If you are not into concocting your own paint, above in my color palette for this DIY project are some pre-mixed paint colors that are similar and will work just as beautifully!
For a similar pre-mixed paint color that matches my Colt Black you can purchase Black Magic D58-6 by Olympic Paints.
Lets get started...
NOTE: If you want to add the classy milk crate sized woven storage baskets below the table you will need to remove the attached shelf from underneath the table as I did.
Sorry I don't have pictures for this exhilarating step but my camera was having a hard time functioning in the blustery, 28 degree weather. If that's not a hardcore DIYer, I don't know what is...LOL
You can find the nice baskets that are pictured under the table at most Target stores, priced around $19.99 each.
1
1. Paint the entire piece with your tinted primer after you have sanded and wiped the piece down with a tack cloth.
Let it partially dry to the touch.
Time to brush on your custom paint color!
2
2. Next I painted a coat of "Colt Black" my own mix of paint of dark chocolate and black. I didn't want it to be too black, mixing the dark chocolate with it achieved that goal...see paint mix recipe.
Let dry to the touch.
3
3. Apply another coat of the same "Colt Black" paint.
Let dry to the touch.
NOTE: Its easier to distress a piece that is almost dry or dry to the touch, than a piece that has dried and cured completely. I used the "dry to the touch" for this method.
4
4. Then wielding my 50 and 80 grit sandpapers, cut through all the layers of paint until some wood showed through, not too much though...a little here and there, mostly on the corners and places that would naturally have wear on them.
5
5. Follow it up with a smoother grit sandpaper. I used a 120-180 grit sandpaper to "smooth out" those rough edges.
Making Your Own Faux Wax Finish
Now the fun part!
I didn't have any white paste wax handy, so I mixed up some of my own "faux wax".
Note: This wax has nothing to do with wax as in candle wax or floor wax or car wax; there is no wax in my "faux wax" at all, do not put wax in the paint!
All I used to make my "faux wax" is paint and water!
To make the "faux wax" I mixed up some white and a little gray paint, watering it down until it was almost the consistency of chocolate milk, but not the COLOR of chocolate milk!
6
6. Make sure the table is placed on a paint drop cloth, plastic or cardboard because it's going to get messy!
7
7. You will need to do this step rather quickly.
Take a big brush and load it with the "faux wax" white paint, sweeping it everywhere and all over the table, in all the seams, scratched, etc... it was so cool to make a mess and actually want it to drip everywhere!
8
8. Let the white "faux wax" coat dry until it is slightly tacky, but mostly still wet. If it's cold out like it was when I did my table, maybe 10-15 minutes.
Otherwise...
Just keep an eye on it. You want to be able to wipe most of the white paint off, so it still needs to be fairly wet.
9
9. Take a damp tack cloth or smooth damp rag and gently wipe most of the white paint off but leave some in the cracks, scratches and seams, that's why you don't want to rub too hard.
10
10. You'll have to wash out the cloth when it no longer picks up paint. Then wipe it again until you have achieved the look you want.
11
11. Let dry completely.
12
12. Next, I took some dark chestnut floor stain and rubbed it all over the white "faux wax" and all over the wood showing through.

13
13. Let it soak into the wood a while before you wipe most of it off with a tack cloth.
The goal here is to give it a worn rustic, yet warm appearance.
14
14. Let it dry overnight, or a day or two, then cover the entire table with a matte clear-coat.
15
15. Let cure.

16
16. Bring into the house. Put brown storage baskets underneath.
Voila!

Marvel at your creative genius!

Bargain Breakdown...
All in all, with my black faux wax coffee table I achieved a very similar look that I saw in the House Beautiful magazine and I am very pleased with the amazing results...so is my husband [BONUS!].
I will definitely be painting some more pieces very similar. But not outside in blustery 28 degree weather again!
Stay tuned and sign up for my awesome DIY newsletter!
Price Breakdown:
Second hand table - $8.00
Paint - $4.00
Not bad...you get a $500 looking table for a mere $12!
Entire Project including baskets:
Baskets: $60 for 3
If you were to use these baskets it still keeps the price under $75.00!
Source: Milk Crate Storage Baskets: Target Stores, for about $19.99 each.
Great news...
You
can do this "faux wax" easily as well. Just follow my simple steps and
you will achieve this popular look. You may need to breath new life into
a table as I did or even a set of chairs or an old bed frame...
The sky's the limit!
 The transformation into my black faux wax coffee table is amazing!
More Tables!
After doing my black faux wax coffee table, I couldn't resist experimenting with other tables...
Check out my to-die-for aqua table distressing DIY project here...
Or my white herringbone end table DIY project here...
Rescue Recycle Reuse
From my artistic eye, I'm always trying to re-create looks of furniture or textiles that I've seen at markets, stores or in books and magazines from junk or second-hand stores...but for less, much less.
Warning: If you continue following my transformations, soon you will not be able to pass by a second-hand store, garage sale or even Craigslist without wondering if that piece of junk can be transformed into something spectacular.
It's a hobby. I love it. And I love sharing my results with you. If the transformation bug has bitten you, be sure to share your project, idea or advice with other DIY Decorators here...
Share Your Thoughts or Project
Do you like this project? Do you have anything to add to it? Have you done a project similar to this? Using my methods? Please share your DIY project or add your comments for all my visitors.

|
|
|
|
|
|
|
Newsletter

June Tailor and Quilt As You Go sewing kits
Since 1961, June Tailor has been developing and manufacturing innovative products for pressing, cutting, piecing and quilting for all levels of sewists from novice to advanced. June Tailor has it all!
Sewing & Cutting Cabinets
The perfect solution for any sewing room! Choose from hundreds of sewing cabinets, cutting tables and sewing chairs with features like rolling caddies, dedicated storage, multi-position lifts and more. Go here to find yours!
TRADE UP AND GO!
How Does It Work?
Trade in your GO! Me or GO! fabric cutting machine to get a great deal on a new fabric cutter!
Step 1
Select your trade-in fabric cutter model and credit method and purchase a Fabric Cutter Trade Up Set.
Step 2
Use the shipping label included with your new fabric cutter to send us the trade-in fabric cutter. Please follow all instructions provided in your confirmation email.
Step 3
Get your trade-in credit once we receive and validate the trade-in fabric cutter.
Go here to learn more!

Recent Articles
-
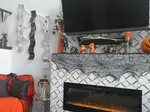
DIY Fireplace Makeover
Oct 03, 24 12:16 AM
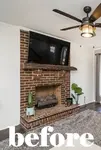 Make your space stunning with the DIY Fireplace Makeover that is also budget friendly.
 -
Less stressful Way to Purchase Traditional Middle Eastern rugs
Jul 10, 22 06:03 PM
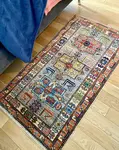 I have always found the purchase of a traditional Middle Eastern rug to be a stressful experience as they are a huge investment. But they are so beautiful
 -
Seasonal Decoration Changes
Feb 27, 21 05:34 PM
 I am in the later half of my life. I have always dreamed of having a home that was a neutral background and I could use artwork and decor to change the